
I have been wrapping up new ideas got from Vue London since last week. I’m really happy to see the community of Vue has grown to such a scale.
There is an interesting speech about the reactivity inside Vue framework that I think is worth sharing. And, I have done my own implementation with ES5 standard defineProperty and ES6 standard Proxy class.
Here is the git repo:
https://github.com/krnan9525/js-reactivity
Also, some references:
Vue Doc - reactivity in depth,
Hackerroom - How to Build Your Own Reactivity System
_So, what is reactivity and why do we care? _
Well, the simple way to understand it is through code examples.
Here is some simple Javascript code:1
2
3
4
5let a = 1, b = 2;
let result = a + b;
// result = 3
a = 2;
// result = 3, because variable a and b doesn't have 'reactivity'
In a lot of scenarios, we would expect some variables’ values changing while the value of their dependency changes. This is especially beneficial in the frontend universe – so we can avoid the whole page being reloaded every time there is a change and a part of the page needs to be re-rendered.
In the following paragraphs, I will briefly walk through the implementation side of this idea, the benefits and the overhead. And since this blog is mainly about JS, I would assume you all have the prior knowledge of basic Javascript and ES6.
First, git clone https://github.com/krnan9525/js-reactivity.
As I mentioned before, there are a few ways to achieve reactivity. In Vue versions lower than 3.0 or 2.6-next, it’s achieved by calling defineProperty function, otherwise, by using Proxy. This also means there will be no native support for IE 11 in Vue 3.0 (you can still polyfill it but some functionality will be missing down the line).
There are several reasons for this switching, biggest two will be supporting addition and deletion of properties and not modifying the original object. You can refer to the Hackerroom link above for more details.
Underlining Workflow for Achieving Reactivity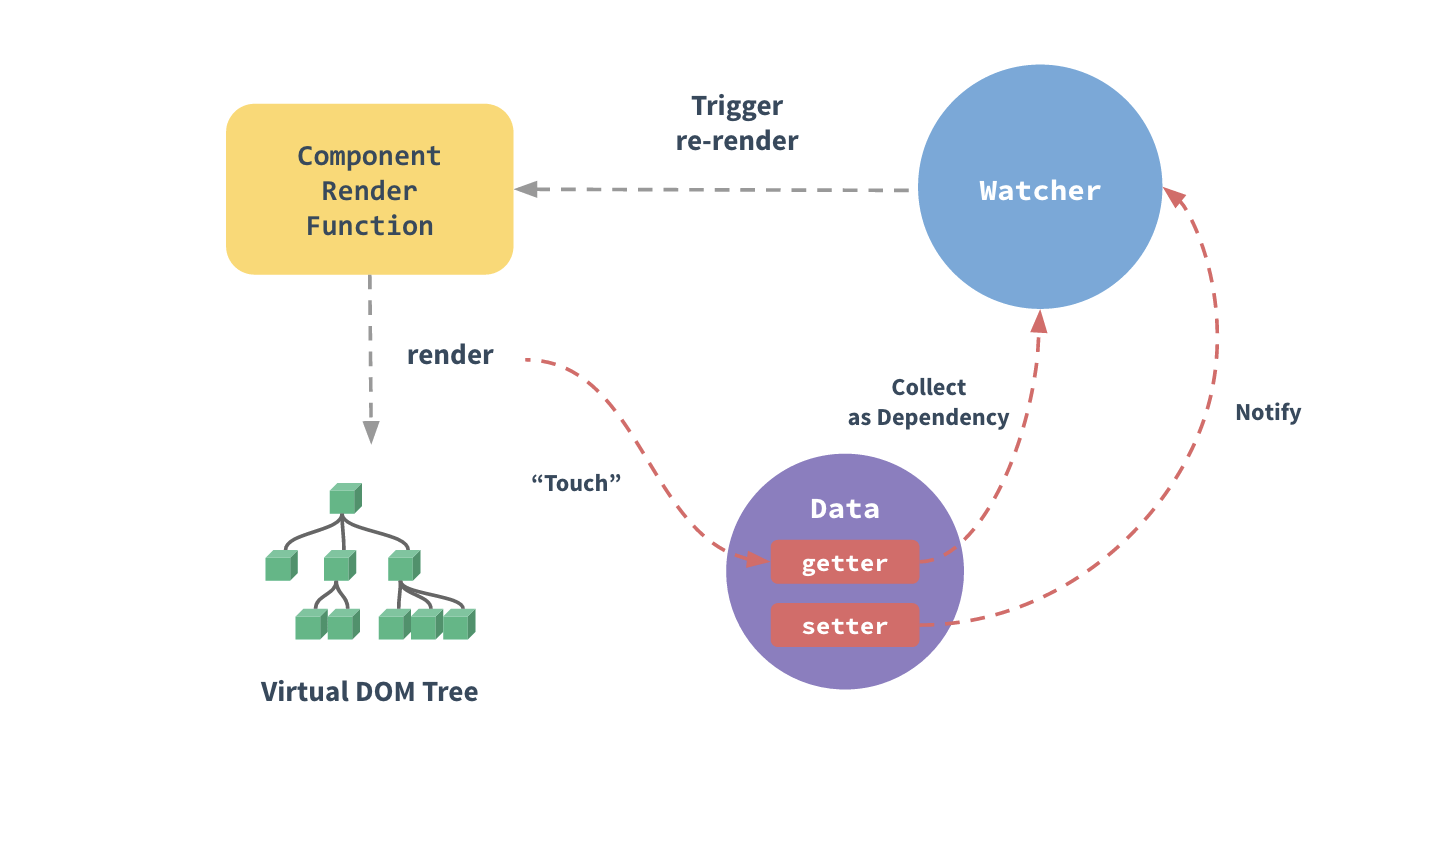
You can find this picture on Vue website, explaining how is done in Vue.
Let’s only focus on Watcher and Data. Note, the Watcher here is different
than what watch property is inside a Vue component.
Data- only the data that deciding other’s value needs to be reactive. In the example above, variable a and b need to be but result doesn’t.
- setter and getter methods are called when access / assign value to a variable.
- getter function will add dependency to the current ‘reactive’ data object.
- setter function will change the value of dependencies when the current value changed.
Watcher- As the name indicated, watchers are used to tell the reactive system that variable A is depending on variable B. So that whenever B got updated, a function should be called to automatically update the value of A.
You might have noticed, this whole workflow is based on subscribe to dependencies and notify dependencies when it needs to be updated. To bring this to programming language, we are going to introduce a class called Dep as a property of the reactivity object.
Depclass- this class contains methods
subscribeandnotifyreflecting the two outbound arrows from thedataobject on the graph. It also has an array propertysubscriberswhich is simply the collection of dependencies gathered bysubscribemethod.
- this class contains methods
Now, let’s do a deep dive into the code.
Coding in Action
- implementation with ES5 style
definePropertymethod (In file@/src/reactive)
Consumer Code:1
2
3
4
5
6
7
8
9
10
11
12
13
14const { beReactive, setWatcher } = require('./lib/reactive')
let product = {
beer: {
price: 20,
amount: 3
}
}
beReactive(product)
let totalPrice = {}
setWatcher(() => {totalPrice.beer = product.beer.amount * product.beer.price})
The code above is very straight-forward,
- -> define variable A
- -> make variable A reactive
- -> define variable B, which is depending on A
- -> set a watcher for variable B
Implantation (lib) Code:1
2
3
4
5
6
7
8
9
10
11
12
13
14
15
16
17
18
19
20
21
22
23
24
25
26
27
28
29
30
31
32
33
34
35
36
37
38
39
40
41
42let _target = null
class _Dep {
constructor () {
this.subscribers = []
}
depend () {
if (_target && !this.subscribers.includes(_target)) {
this.subscribers.push(_target)
}
}
notify () {
this.subscribers.forEach(sub => sub())
}
}
const beReactive = (vals, index = undefined) => {
// call _setRecativityForValue function recursively for all properties of 'vals'
}
const _setReactivityForValue = (val, index) => {
let _value = val[index]
const dep = new _Dep()
Object.defineProperty(val, index, {
set (newVal) {
_value = newVal
dep.notify()
},
get () {
dep.depend()
return _value
}
})
}
const setWatcher = (func) => {
_target = func
_target()
_target = null
}
module.exports = { beReactive, setWatcher }
This code should be clear to read, just a few things to note:
- for watchers, we accept a function as a parameter to construct the relation between multiple variables. It will first set the internal variable
_targetto the target function then run it, and in the meantime, the getter function on all reactive properties will be called and theirdepend()function will be called to push thetargetfunction into theirsubscriberarray. - when a new value is set, the setter function will be called and all the depending variables will be updated.
- implementation with ES6 style
ProxyClass (In file@/src/reactiveWithProxy)
There is only one different on consumer side. As I mentioned before, by lifting ES6 Proxy class, we have the ability not changing the original value. So that, consumer need to assign the value resolved by the proxy to a variable.
Consumer Code:1
2
3
4
5
6
7
8
9
10
11
12
13
14
15
16
17
18
19
20
21
22
23
24
25
26
27
28
29
30const { beReactive, setWatcher } = require('./lib/reactiveWithProxy')
let product = {
beer: {
price: 20,
amount: 3
}
}
const productReactive = beReactive(product)
let totalPrice = {}
setWatcher(() => {totalPrice.beer = productReactive.beer.amount * productReactive.beer.price})
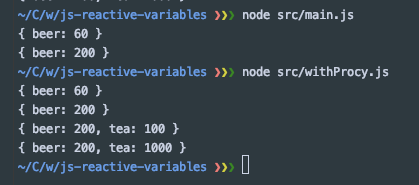
console.log(totalPrice)
productReactive.beer.amount = 10
console.log(totalPrice)
productReactive.tea = {amount: 10, price: 10}
setWatcher(() => {totalPrice.tea = productReactive.tea.amount * productReactive.tea.price})
console.log(totalPrice)
productReactive.tea.amount = 100
console.log(totalPrice)
The above code follows the same workflow as the defineProperty version consumer code, except now you can add reactive property after the object is defined. And this is a huge improvement compare with ES5 defineProperty function.
Implantation (lib) Code:1
2
3
4
5
6
7
8
9
10
11
12
13
14
15
16
17
18
19
20
21
22
23
24
25
26
27
28
29
30
31
32
33
34
35
36
37
38
39
40
41
42
43
44
45
46
47
48
49
50
51
52
53
54
55
56
57
58let _target = null
// same as the previous example
class _Dep {
constructor () {
this._subscribers = []
}
depend () {
if (_target && !this._subscribers.includes(_target)) {
this._subscribers.push(_target)
}
}
notify () {
this._subscribers.forEach(sub => sub())
}
}
// function entry for achieving reactivity
const beReactive = (vals) => {
return _setReactivityForValue(vals)
}
// same as the previous example
const setWatcher = (func) => {
_target = func
_target()
_target = null
}
// not all the deps for every object are stored in one object
const _constructDeps = (vals) => {
......// please refer to the code on Github
}
// recursively setting reactivity for all properties of an object, as well as the added properties after the object is defined.
const _setReactivityForValue = (val) => {
let _deps = _constructDeps(val)
let validator = (varPath = []) => {
return {
get (obj, key) {
let _path = varPath.slice()
......// please refer to the code on Github
_currentDep[key].depend()
return obj[key]
},
set (obj, key, newVal) {
......// please refer to the code on Github
obj[key] = newVal
_currentDep[key].notify()
return true
}
}
}
return new Proxy(val, validator([]))
}
module.exports = { beReactive, setWatcher }
Console Output
Todo: Using reactivity in Vue, with code examples